Plumeria Flowers In Chicago

Tuesday, December 11, 2012

Slideshow - How To Care For Poinsettia Plants Throughout The Entire Year

The poinsettia is considered the Christmas Holiday plant and is generally purchased in full bloom at this time of the year.

What is the best care for poinsettia plants so they survive the Holiday Season?
How long can you expect the plants to last?
Can poinsettia plants ever be planted in the garden or are they just seasonal plants for the Holidays?

Like many tropical plants poinsettias can be grown successfully indoors when properly tested and proven guidelines are followed.

To view the slideshow CLICK HERE >>> Poinsettia Care.


Thursday, November 29, 2012

How To Care For Poinsettia Plants Throughout The Entire Year


The poinsettia is considered the Christmas Holiday plant and is generally purchased in full bloom at this time of the year. 

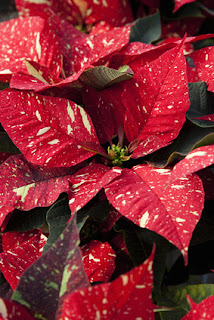
Red Poinsettia Plant

What is the best care for the poinsettia plant so it will survive the Holiday Season

How long can I expect the plant to last? 

Can it ever be planted in the garden or is it just a seasonal plant for the Holidays?

Pink and White Poinsettia Plant

Initial Care of your newly purchased Plant....

When purchasing poinsettia plants make sure the plant is wrapped properly to protect it from cold temperatures during the trip home.

  • Place it near a sunny window.
  • Maintain a temperature above 65 degrees F.
  • Mist the plant daily with lukewarm water.
  • To avoid spots on the leaves from misting use distilled water.
  • Water the plant when the surface is dry to the touch.
  • Water thoroughly until the water completely drains into the saucer.
  • Make sure to empty the saucer of drained water.
  • Keep the plant away from all drafty areas, hot or cold air.


Red and Gold Poinsettia Plant
  
 Poinsettia Care after the Holidays....
January to MarchKeep watering when the surface is dry and misting the plant several times a day if humidity in your home is low. Poinsettias love the humidity the misting creates.

AprilGradually decrease watering allowing the poinsettia plant to get dry between watering. But be careful that the plant does not shrivel. Discontinue misting during this period. After your poinsettia is used to this dryness, move it to a cool basement or any place where the temperature is about 60 degrees F for a period of about four weeks.

MayCut the plant back to about 4-5 inches above the soil level, repot into the next size container and sprinkle one tablespoon of bone meal over the roots. At this time you may also add some slow release fertilizer, like 14-14-14, or 19-6-12 for faster growth. Water the newly transplanted plant with Superthrive or any transplant solution which contains Vitamin B1. Now it’s time to place your poinsettia plant in a sunny window where the temperature is above 65 degrees F. Mist the plant daily and water when the surface is dry. If you haven’t added a slow release fertilizer while transplanting, start fertilizing with an all purpose fertilizer every two weeks as soon as new growth appears.

JuneMove your plant outside into a partial sunny location and continue to water and fertilize it.

JulyAt the beginning of the month cut back each stem about an inch. This will encourage your poinsettia to branch resulting in a bushy plant. If you don’t pinch it back, your poinsettia grows tall without side branches.

AugustBy now your plant should have branched well and it’s time to cut it back one more time so each shoot has about four leaves left. At this time continue with your fertilizing, misting, and watering schedule.

SeptemberContinue to fertilize, misting, and water and make sure the temperature stays above 65 degrees F.

OctoberAs your poinsettia needs short days in order to set buds, you have to provide it with twelve hours of total darkness starting the first day of October. Give the plant darkness from about 5 pm to 8 am every day during this period. Without these additional hours of darkness poinsettias won’t set buds and the leaves remain green. Place a box or black plastic bag over the poinsettia plant making sure no light reaches the plant. During daytime move the plant to a sunny window and continue to fertilize, misting, and water.

NovemberAt the end of the month discontinue the darkness treatment and leave the plant in its sunny window. At this time you should be able to see flower buds.

DecemberDiscontinue fertilizing about the middle of the month. Continue watering and misting and treat your poinsettia plant just like you did after you bought it. At this time your poinsettia should be blooming again.


Like many tropical plants poinsettias can be grown successfully indoors when properly tested and proven guidelines are followed. One can enjoy poinsettia plants for months until it is time to bring out the Easter Lily.

Copyright @ Bob Walsh
 

Monday, October 29, 2012

Amaryllis Care - Amaryllis Bulbs and Flowers

Amaryllis is also known as Belladonna Lily or Naked Lily.

The genus consists of two species. One species, Amaryllis belladonna, is indigenous to South Africa, specifically the Cape of Good Hope.

Sometimes Amaryllis belladonna is confused with Hippeastrum, a flowering bulb which is commonly sold during the winter months. It easily blooms indoors.

Hippeastrum is a genus comprised of about 90 species and more than 600 hybrids native to the tropical and subtropical regions from Mexico south to Argentina and throughout the Caribbean.

Most Amaryllis bulbs, Hippeastrum, produce two flower stalks with each stalk producing four to six flowers.


Amaryllis 'Desire'
Amaryllis 'Desire'

Dutch growers are considered the first commercial breeders of Hippeastrum dating back to the 18th century. New hybrids are introduced to the public every year.

Hybrids with large, single flowers include....
  • Appleblossom 
  • Beauty Bells 
  • Benfica 
  • Cherry Crush 
  • Desire
  • Ferrari Red
  • Minerva
  • Picotee
  • Vera, and many more.

Hybrids with double flowers include.... 
  • Aphrodite
  • Blossom Peacock
  • Dancing Queen
  • Double Record
  • Siren, and many more.

Cybister Amaryllis produce exotic looking flowers with narrow petals and include 
  • Chico
  • Emerald
  • La Paz
  • Lima, to mention a few.


Amaryllis 'Siren'
Amaryllis 'Siren'

When purchasing an Amaryllis bulb, Hippeastrum, it already has a perfect embryo flower formed. The bulb is ready to be planted.

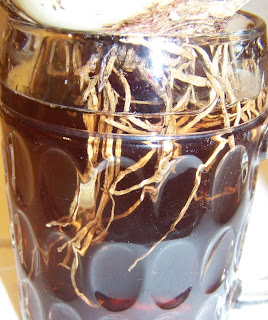
Amaryllis care starts with soaking the roots of the newly purchased bulb in a cup or glass of lukewarm water to which you added some seaweed if available. 

Make sure that only the roots are submerged in water and not any part of the bulb itself. 

Keep the base of the bulb above water level.


Roots of Amaryllis bulb soaking in seaweed and water solution.
Seaweed and Water

Leave the roots in the water-seaweed mix overnight

It is ready to be planted the next day

The overnight soaking of the roots in the seaweed mixture hydrates the roots and enhances the growth of your Amaryllis plant.


To plant your Amaryllis bulb.... 
  • Start with a 6 inch container. 
  • Fill it one third with a well draining potting mix.
  • Place the bulb in the center of the pot.
  • Sprinkle some bone meal around the roots. Bone meal promotes a healthy root system and vibrant Amaryllis flowers.
  • Cover the bulb with the potting mix to the point that the "neck" of the bulb is above soil level.
  • Water the pot thoroughly with lukewarm water to which you add some seaweed and/or Superthrive which helps your Amaryllis bulb to start the growth process
  • Place your newly potted bulb in front of a well lit window.

Amaryllis 'Cherry Crush'

Caring for your planted Amaryllis bulb....
  • Don't water again until you see some growth of the leaves, flower stalk or both.
  • During the growing period keep the potting mix moist.  
  • When your Amaryllis bulb has finished flowering, cut off the flower stalk and continue to grow it until August or September.
  • During this period keep it in good light, water regularly and fertilize every other week with a fertilizer high in Phosphorus and Potassium. You do this to promote next season's flowers.
  • In August or September stop watering and fertilizing.
  • Store the bulb in the pot in a dark place.    
  • In December or January remove most of the potting mix from the top of the container to expose the roots..
  • Sprinkle some bone meal over the roots and cover with fresh potting mix.
  • Water with seaweed and/or Superthrive.
In a couple of months your bulb will reward you again with beautiful Amaryllis flowers.

Copyright © Bob Walsh
www.BobWalshPlumeriaCare101.com 
www.BobWalshFrangipaniPlumeriaPflege.com 
www.HowToGrowPlumeriaFrangipani.com 
 

Wednesday, September 19, 2012

What To Consider Before Purchasing Plumeria Cuttings And Plumeria Plants

Welcome All Gardeners,

When searching the internet for plumeria 
cuttings to purchase, it's easy to get 
carried away.

Practically every cutting you see is one
you want for one reason or another. 

Some you choose because of the name.

The other choices you make are based 
on the color, fragrance and/or the price. 

In the end you order a bundle of cuttings
and all purchased are justified based on 
your needs and wants to complete your
plumeria collection.
  
The day that the cuttings arrive at your
front door, you open the boxes and get 
even more excited as you plant each new 
cutting noticing how many of them already
have developed small "claws". 

These claws soon will develop into leaves
and new growth on any plumeria cutting is 
reason to celebrate. 

Arranging all your newly ordered planted
plumeria cuttings where you want them,
you proudly and excitedly admire these
new additions to your collection.

But this excitement soon can turn into a
problematic logistic question, "Why did I 
buy so many cuttings?", once the 
plumeria cuttings have rooted and start 
to grow "full steam ahead" developing 
leaves more than a foot long.

It's relatively easy to plant and space 
15 or more unrooted cuttings as the 
picture below of some of the cuttings I 
planted at the beginning of September 
2012 illustrates. 


Newly planted plumeria cuttings in Chicago.
Plumeria cuttings planted on Sept. 4, 2012


It's important to consider the growing space you 
have available for your plumeria cuttings after
they start actively growing.  

The overlapping and crowding newly growing 
leaves open the door to harmful disease and 
insect problems due to interference with 
proper lighting, humidity and airflow of each
individual planted cutting.


The picture below shows Plumeria 'Makanani'.

The cutting was planted  on  May 12, 2012 
in Chicago with the spent inflorescence 
still attached and three branches just 
emerging.

As of September 6, 2012 the plant 
already had a span of 28 1/2 inches 
with leaves up to 13 inches long.


Growing in Chicago - Plumeria 'Makanani'
 Plumeria 'Makanani'


The picture below shows Plumeria 'Pink Pansy' 
which is considered to have a compact growth
habit.

The cutting, which had just flowered and started
to develop two branches, was planted, like
Makanani above, on May 12, 2012 in Chicago.

As of September 6, 2012 the plant had a span 
of 16 inches with leaves averaging  8 inches 
in length.


Growing in Chicago - Plumeria 'Pink Pansy'
Plumeria 'Pink Pansy'


When comparing the sizes of Makanani and 
Pink Pansy, the young plants already exhibit
the difference in growth habit at an early 
stage.

Thankfully, many internet retailers list the 
growth habit of plumerias offered as cuttings 
and/or plants.

Next time you're purchasing plumeria 
cuttings and/or plants consider their growth 
habit if growing space is an issue for you.

If the growth habit of a specific plumeria you 
want to purchase isn't listed, contact the 
retailer by email.

When purchasing plumerias on the internet,
it is important to consider the big picture of 
where am I going to put all the cuttings I want 
to buy.  

And where can they be planted to provide 
the best growing conditions without 
endangering them and preventing them 
from proper and successful growth.


My plumeria book,
How To Grow Plumeria - Frangipani Anytime Anywhere!,
which is currently offered with FREE SHIPPING,
gives you step-by-step instructions what to do
with your plumerias now and enjoy them again 
flowering during the 2013 growing season.


Step-by-step plumeria book.


Happy Growing,

Bob Walsh
www.HowToGrowPlumeriaFrangipani.com 

Monday, July 23, 2012

Helpful Watering Tips During Periods Of Drought

With most parts of the country suffering under high temperatures and/or drought conditions I want to share with you a newsletter that I recently received from Jung Seeds....


The drought and heat that we are experiencing this summer has not been seen for many years and can do a lot of damage to your trees, shrubs, and perennials if they are not managed properly. The yellowing and curled leaves, fruit drop and other symptoms are effects seen on plants right now, but there can be intermediate and long-term damage if watering is not done. 


Secondary damage may be increased by wild life and insects feeding on garden plants and fruits. Long term damage may be root damage, diminished winter hardiness, twig die back and eventual death. So here are a few things that can be done to lessen the damage done by drought.

Prioritize the watering of plants
so the most susceptible are taken care of first.

The first class of plants that should have high priority are your trees and shrubs

This is most important with any new plantings. New plantings would include any trees and shrubs that have been planted in the last two years. When watering these plants it is necessary to let the water trickle on the ground for a longer period of time. This will insure that water gets down to the roots that take up the water. If you go out and water for a short period of time, the water will not reach the roots where it needs to go.


The next class of plants that should have medium to high priority is your perennials, fruits and nut trees, and newly planted grass or sod. These plants have most of their roots in the top 6 inches of soil and if the drought gets severe, damage or complete death will occur if watering is not done.

Lower priority plants in extreme drought would be established lawns, herb plants and annuals. The reason for annuals and herb plants is they require the most watering to keep alive and can be replaced inexpensively or can be replanted next year when adequate moisture is available.


Lawns

Lawns are composed of bluegrass and fescues that are adapted to drought conditions. They will go dormant in seasons of drought and will recover when the rains and cool weather appear in the fall. 

If you lightly water your grass during times of drought, the roots of the plants will stay shallow. 

When you stop watering, the roots will dry up and the plants will be more susceptible to drying out and death than plants that have not been watered. 

If you do mow the lawn the height should be increased by at least an inch to help shade and shield the crowns from drying out. 


Keep foot and equipment traffic to a minimum as the crowns of the grass plants become brittle and can be easily damaged by walking on them. This is especially true when the grass is brown and brittle.

Perennials, Vegetable Plants and Annuals

These plants tend to have shallow roots systems. Frequent watering is necessary to keep them alive. 

Mulching these plants to shade the soil and keep the weeding down is an excellent use of mulch. 

The mulch should be organic such as ground bark, cocoa bean hulls, ground corn cobs, shredded leaves or grass clippings make excellent mulch. The mulch will allow you to water less frequently and will decompose which builds up your soil. When mulching use a little extra fertilizer to help break down the mulch.


Weeding

It is very important to keep your gardens, perennial beds and annual beds free of weeds. 

Weeds are the plants that are best adapted to an area and will tend to be more aggressive when water is limited. 

These plants will then grow well and take up most of the moisture. This will make it even harder for the plants you want to grow and succeed.


Watering Tips

Preferred Method of application....It is important to apply enough water to thoroughly wet the root zone when water is applied. 

Larger plants such as trees may require a drip for a couple hours to properly water. To use this soaking application it would be best to invest in a soaking hose or drip irrigation for vegetables, annuals and small fruit. Water is applied at lower pressure so it just trickles out of the hose to allow the whole root zone to be well watered.

When to Water....Water should be applied when the soil is completely dried out. Wilting or scorching of leaves is a sure sign of the need for water. 


Early morning is the best time of the day to water so the the leaves dry out by mid morning. 

Watering in the evening will sometimes lead to more plant diseases as the water on the leaves will not dry out and spores of the diseases will have all night to germinate and infect your plants.

How much....A good rule of thumb is to apply one inch of water per week over the surface of the soil. This will vary depending on the type of soil. If you have a heavy clay soil, less water is needed, but if you have a sandy soil the amount needed may be an inch twice a week instead of once a week.


Others Who Need Water

When thinking about the need for water, don't forget the wildlife that also is experiencing these hot, dry conditions. 

Put out a bird bath for the fine feathered creatures and maybe even a pan of water in a protected area for other wildlife. They also can suffer from the lack of water.

Happy Growing,